Installation
Install QTPyLib using pip
$ pip install qtpylib --upgrade --no-cache-dir
Possible Conda/Anaconda Issue
If you’re using Python under a Conda/Anaconda enviroment, it is possible you’ll run into the following error message during installation that’s caused by a documented Anaconda bug:
Installing collected packages: setuptools, cryptography
    Found existing installation: setuptools 27.2.0
Cannot remove entries from nonexistent file ~/anaconda3/lib/python/site-packages/easy-install.pth
To get conda to play nice with pip, run this command before installing/upgrading QTPyLib:
$ pip install --ignore-installed --upgrade pip setuptools
Requirements
- Python >=3.4
- Pandas (tested to work with >=0.18.1)
- Numpy (tested to work with >=1.11.1)
- PyZMQ (tested to work with >=15.2.1)
- PyMySQL (tested to work with >=0.7.6)
- pytz (tested to work with >=2016.6.1)
- dateutil (tested to work with >=2.5.1)
- Nexmo-Python for SMS support (tested to work with >=1.2.0)
- Twilio-Python for SMS support (tested to work with >=5.4.0)
- Flask for the Dashboard (tested to work with >=0.11)
- Requests (tested to work with >=2.10.0)
- IbPy2 (tested to work with >=0.8.0)
- ezIBpy (IbPy wrapper, tested to work with >=1.12.66)
- Latest Interactive Brokers’ TWS or IB Gateway installed and running on the machine
- MySQL Server installed and running with a database for QTPyLib
Install IB TWS / Gateway
In order for QTPyLib to be able to subscribe to market data and submit orders, you must have the latest version of Interactive Brokers’ TWS or IB Gateway installed, running and properly configured on your machine.
Installation
Download TWS (offline version) or IB Gateway (requires less resources = recommended) from Interactive Brokers’ website, and follow the installation instructions.
Configure for API Access
After you install either TWS or IBGW, login using your account
(or use edemo/demouser). The next thing to do is to go to the menu,
choose File, then choose Global Configuration.
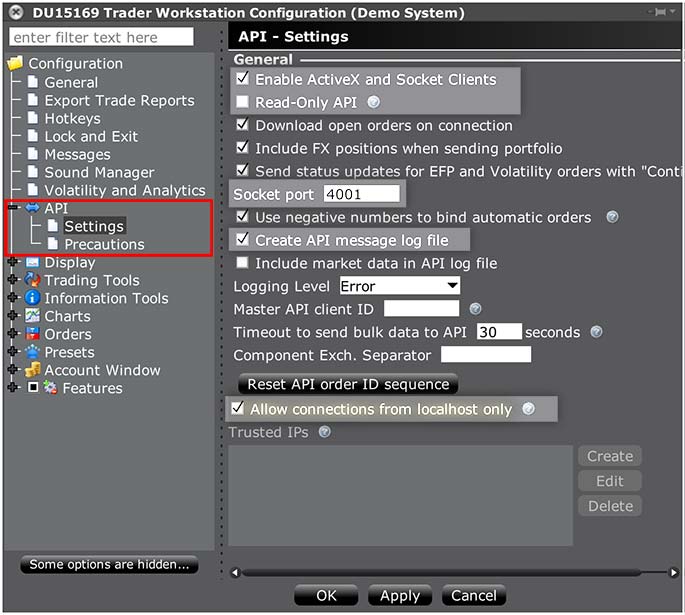
Next, choose API on the left hand side, then go to Settings.
In the settings screen, make sure to set the options highlighted in the screenshot below:

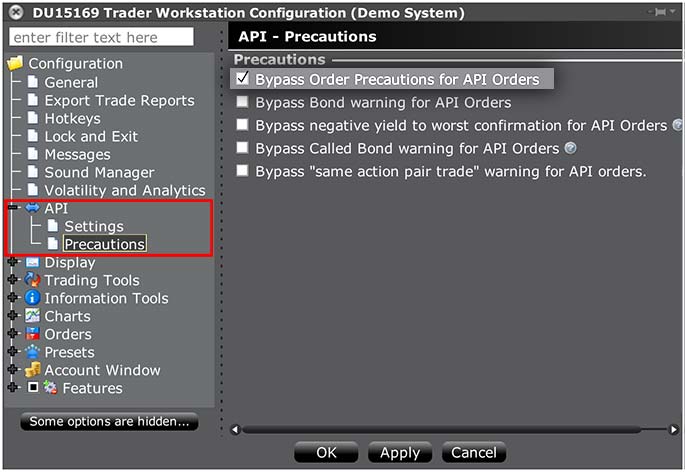
Next, go to Precautions on the left side menu, and make sure *Bypass Order Precautions for API Orders is checked.

Install MySQL
QTPyLib stores historical data and trades in a MySQL database, so you’ll need to have MySQL (or one of its off-springs like MariaDB or Percona) installed and running on your machine.
Installation
To install MySQL, follow the installation instructions.
On Debian/Ubuntu:
$ sudo apt install mysql-server
On Redhat/Fedora:
$ sudo yum install mysql-server
On macOS (using Homebrew):
$ sudo brew install mysql
For Windows, simply download the installer and run it.
During the installation process, you will be asked to set a root password for MySQL; generate a password and enter it when prompted in the next step.
Create the Database
Once you have MySQL installed, create a database and grant a new/existing user permissions on the database. This is the user and password you will use to connect to the database in your code.
By default, and unless specified otherwise, QTPyLib looks for a database named qtpy
and user named root. To create this database and user, run this command:
$ mysql -u root -p -e "create database qtpy;"
If you want ro create a dedicate user for this database (highly recommended), run this command:
$ mysql -u root -p -e "create database qtpy; create user '<user>'@'localhost' identified by '<password>'; grant all privileges on qtpy .* to '<user>'@'localhost';"
* Replace <user> with the desired user name and <password> with the desired password for that user.
Now that your system is setup, it’s time to start programming your Algo…